
Last Updated on October 23, 2026 by recipeinspire
For your first crochet skull pattern, start with a flat, single-crochet appliqué so you can shape the face in rows and add the eyes and teeth with embroidery. You get a small motif to sew onto a bag or turn into hanging décor, with no stuffing or separate pieces to join.
When choosing skull crochet patterns, check how you will form the face. Embroidered features give you control over the expression; open eye sockets require more careful stitch placement. With free crochet skull patterns, also check whether you receive web instructions or a downloadable file before gathering your supplies.
How to Crochet a Simple Flat Skull
You’ll crochet this flat skull from the forehead down, widening the head before narrowing the jaw.
Gather: smooth worsted-weight cotton, a compatible hook, black embroidery thread, scissors, and a yarn needle. Choose a hook that gives you close, comfortable stitches.
Use US terms: ch = chain; sc = single crochet; inc = work 2 sc in one stitch; sc2tog = single crochet 2 stitches together. For sc2tog, draw up a loop in each of the next 2 stitches, then yarn over and pull through all 3 loops.
Chain 1 and turn after every row except the last. Your turning chain does not count as a stitch.
- Foundation: Ch 7.
- Row 1: Sc in the second chain from your hook and each remaining chain. 6 stitches.
- Row 2: Inc, sc 4, inc. 8 stitches.
- Row 3: Inc, sc 6, inc. 10 stitches.
- Rows 4–6: Sc across. 10 stitches per row.
- Row 7: Sc2tog, sc 6, sc2tog. 8 stitches.
- Row 8: Sc2tog, sc 4, sc2tog. 6 stitches.
- Row 9: Sc2tog twice, sc 2. 4 stitches.
- Row 10: Sc across. 4 stitches. Fasten off.
Embroider matching oval eyes across rows 4–6, leaving space between them. Add a small nose below. Stitch a horizontal mouth across the jaw, then short vertical lines for teeth. Keep your embroidery loose enough to preserve the flat fabric.
Use this free crochet skull pattern when you want to learn how to crochet a skull with a solid face.
How to Turn a Skull Motif Into a Granny Square
Your easiest skull granny square starts with a plain square and a finished skull sewn onto its center.
Choose a background with enough contrast to show the skull’s outline. Before attaching the motif, block both pieces according to your yarn’s care instructions. Pin the skull in place, then use its yarn tail to stitch around the edge without pulling the square inward.
Keep your sewing stitches close to the motif’s edge. Check the back as you work so your needle catches the square securely without leaving long, loose strands.
For a skull built directly into the square, follow a dedicated skull granny square crochet pattern. You can use free web instructions that work from the skull’s center outward into a square. That construction needs its own stitch placement around the face.
Before joining squares into a larger project:
- Match your finished square sizes.
- Count the stitches along each joining edge.
- Use the same yarn weight throughout.
- Block your squares before assembly.
If your square cups, check for tight stitches or missed increases. If its edges ripple, check for extra stitches before trying to stretch it into shape.
Making Stuffed Skulls and Colorful Sugar Skulls
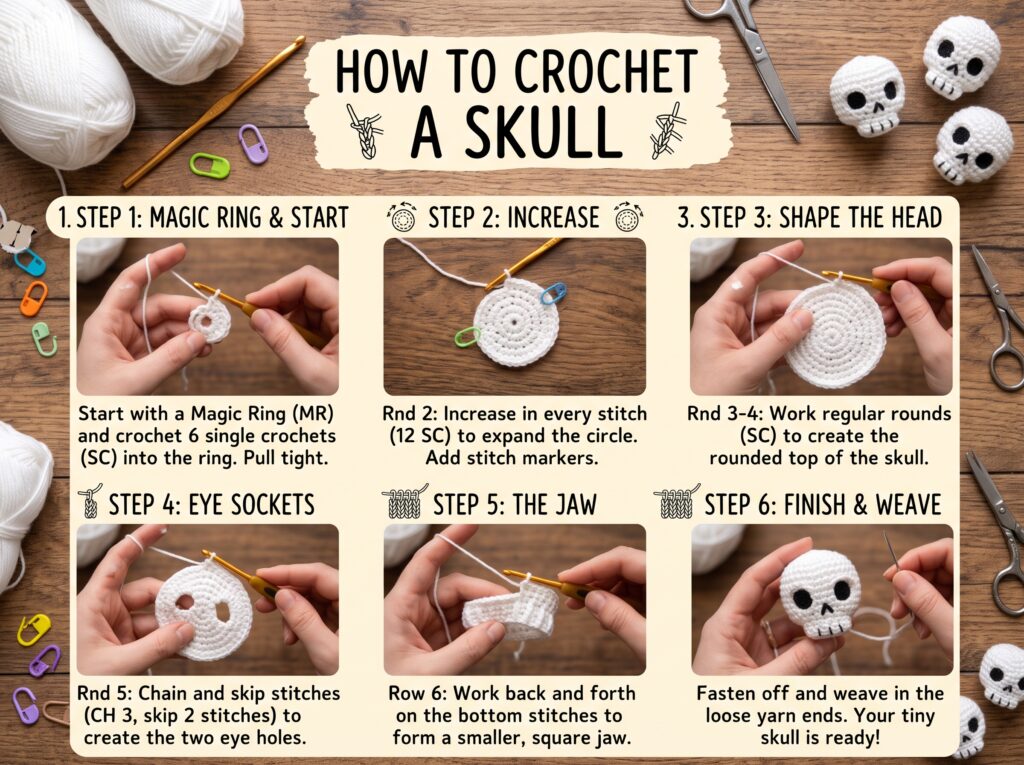
For a rounded amigurumi skull, you’ll need a separate pattern that shapes the head through increases and decreases.
Your flat appliqué gives you a decorative front panel. For sculpted skull amigurumi, choose instructions that explain the forehead, eye sockets, and jaw. You can follow a mini skull amigurumi construction with no sewing, though its shaping calls for careful attention.
In amigurumi crochet, use a stitch marker to track the beginning of each round. Check the fabric before adding filling: visible gaps call for firmer tension or a smaller hook. Add stuffing gradually so you preserve the jaw shape without stretching the stitches.
For sugar skull amigurumi, plan your embroidery before closing the head. You’ll find a free downloadable sugar-skull pattern using single crochet and stuffed construction. Check each listing’s format, since free web instructions and paid PDFs are separate offerings.
When decorating a Day of the Dead skull, keep its cultural meaning in view. Día de Muertos is a Mexican remembrance tradition honoring deceased loved ones, distinct from Halloween. If you choose an amigurumi skull crochet pattern inspired by that tradition, approach its floral details and symbolism with care.
For a young child’s project, embroider the features and leave off beads or other detachable decorations.
Skull Shawls, Scarves, Bags, and Earrings
You can reuse your flat motif on accessories, while a lace skull shawl needs a pattern designed around its openwork.
Choose your next project by how you want the skull to function:
- Skull shawl: Follow dedicated lace instructions for skulls formed by chains and stitch groups. Check your counts at the end of each repeat; a missed chain changes the face and the surrounding lace.
- Crochet skull scarf: Sew motifs onto a solid scarf, or join skull squares into a strip. Keep appliqués away from areas where bulky stitching would press against your neck.
- Scary skull bag: Attach your motif to a firmly crocheted bag panel before assembly. You’ll have easier access to the back for securing embroidery and sewing tails.
- Skull trick or treat bag: Reinforce the handle attachments and consider a fabric lining to support the contents. Keep loose yarn ends out of the bag’s interior.
- Day of the Dead earrings: Use fine cotton thread and a matching small hook for lightweight motifs. Secure each finding through a firm stitch, then check both earrings for equal hanging height.
For Day of the Dead sugar skull earrings, keep embroidered details small enough to preserve the outline. Follow the product label if you use fabric stiffener, and let each piece dry fully before adding hardware.
When browsing crochet skull patterns for wearables, check finished dimensions and yarn requirements. Changing yarn weight changes both the motif’s size and its weight.
Turning Small Skull Motifs Into Festive Garlands
Turn your finished motifs into a Halloween skull garland by attaching each skull at two points along a crocheted cord.
Complete the embroidery and weave in loose ends before assembly. Block the skulls flat, then lay them out along the cord to check your spacing. Leave bare cord at both ends for hanging.
Use this assembly order:
- Crochet a chain cord to suit your display space.
- Lay the cord straight without stretching it.
- Position your skulls with even gaps.
- Sew each skull to the cord near both upper corners.
- Lift the garland and adjust any motif that tips forward.
Those paired attachment points help keep the faces upright. If your cord sags under the weight, shorten the span or add another supported hanging point.
For a sugar skull garland, embroider the motifs before attaching them. Keep the remembrance setting separate from your Halloween display when celebrating Día de Muertos.
When combining Halloween crochet patterns, choose motifs with similar finished weights so the cord hangs evenly. You can repeat the same Halloween crochet pattern throughout for consistent sizing, or alternate skulls with lightweight shapes.
Hang your finished garland clear of candles, heaters, and children’s reach. Store it flat or loosely wrapped around cardboard to reduce tangling.
Start With One Skull and Build Your Next Project
Start with one finished skull crochet pattern motif, then choose an adaptation that suits its flat shape.
Check your row counts and adjust the embroidery until you like the expression. Sew that first skull onto a square or bag, or make matching pieces for a garland. When you move to sculpted skulls or lace shawls, use dedicated instructions for their shaping.
Keep a note of your yarn, hook, and embroidery placement so you can make the next motif to match.