Main Dishes

Discover a delicious collection of main dishes to satisfy every craving! From comforting classics to bold international flavors, find easy-to-follow recipes for hearty dinners, healthy options, and crowd-pleasing meals. Perfect for family dinners, special occasions, or quick weeknight meals. Explore now and make every meal unforgettable!

Vietnamese Noodle Salad with Tangy Dressing

Vietnamese Noodle Salad with Tangy Dressing is a refreshing and healthy dish that is perfect for any occasion.

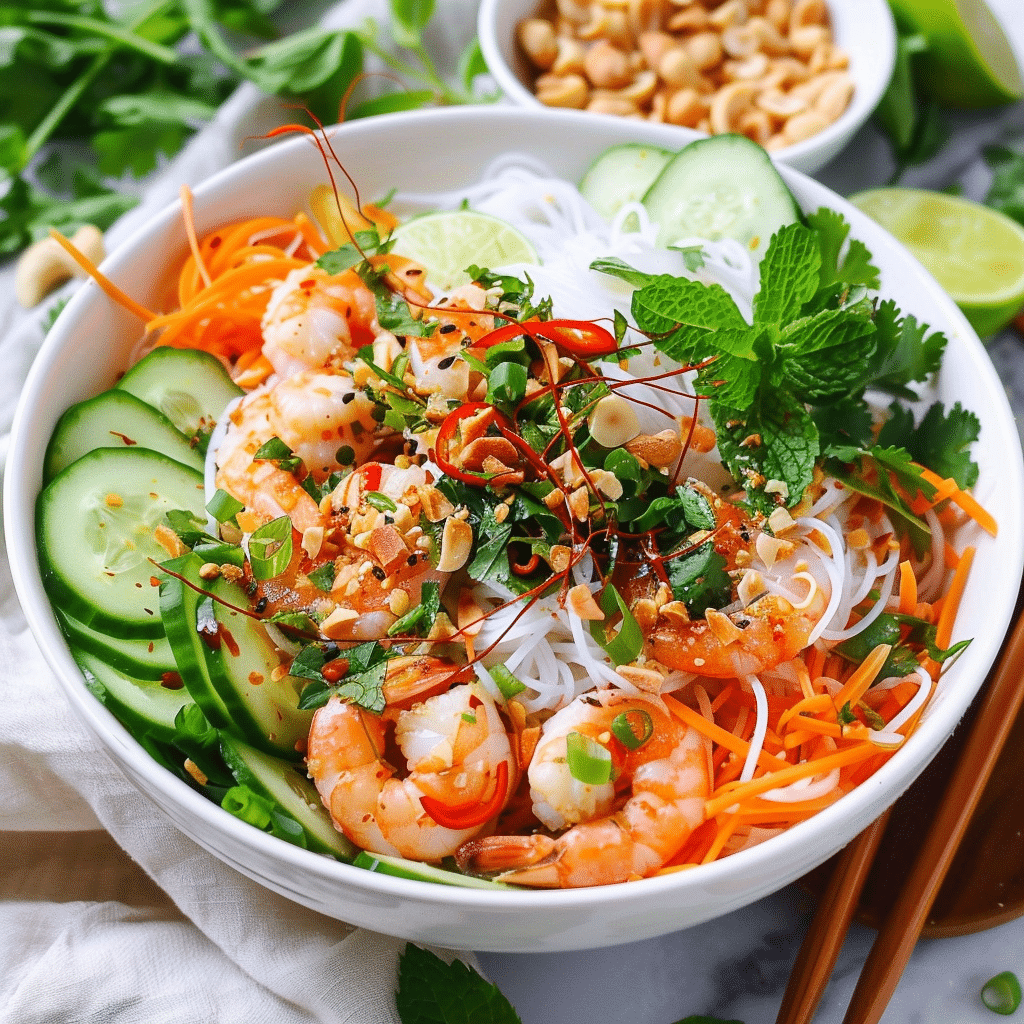
Vietnamese Noodle Salad with Tangy Dressing: A Refreshing and Flavorful Dish

Vietnamese Noodle Salad with Tangy Dressing is a refreshing and healthy dish that is perfect for any occasion.

Vietnamese Noodle Salad with Tangy Dressing is a refreshing and healthy dish that is perfect for any occasion. This salad is a combination of vermicelli rice noodles, fresh herbs, and vegetables that are tossed in a simple and tangy dressing made of soy sauce, lime juice, sugar, rice wine vinegar, and garlic.

The Essence of Vietnamese Noodle Salad lies in the balance of flavors and textures. The noodles provide a soft and chewy base, while the vegetables and herbs add a refreshing crunch and aroma. The dressing ties everything together with its tangy and savory notes that complement the sweetness of the vegetables. This salad is a perfect example of the Vietnamese cuisine’s emphasis on fresh ingredients, bold flavors, and healthy eating.

Key Takeaways

  • Vietnamese Noodle Salad is a refreshing and healthy dish that combines vermicelli rice noodles, fresh herbs, and vegetables.
  • The Essence of Vietnamese Noodle Salad lies in the balance of flavors and textures.
  • The salad’s tangy dressing is a simple yet flavorful combination of soy sauce, lime juice, sugar, rice wine vinegar, and garlic.

The Essence of Vietnamese Noodle Salad

Cultural Significance

Vietnamese cuisine is known for its fresh and vibrant flavors, and Vietnamese noodle salad with tangy dressing is no exception. This salad is a staple in Vietnamese cuisine and is enjoyed as a light and refreshing meal or as a side dish to complement other dishes. Vietnamese noodle salad is a perfect representation of the balance of flavors that is so important in Vietnamese cuisine. The tangy dressing is the star of the dish, bringing together the sweet, sour, salty, and spicy flavors that are so characteristic of Vietnamese cuisine.

Key Ingredients

Vietnamese noodle salad is made with vermicelli rice noodles, fresh herbs, and vegetables. The salad is then tossed with a delicious Vietnamese dressing that is made with fish sauce, lime juice, sugar, garlic, and chili. The key ingredients in Vietnamese noodle salad are:

  • Vermicelli rice noodles: These noodles are made from rice flour and are thin and translucent. They are a staple in Vietnamese cuisine and are used in many dishes, including pho and spring rolls.
  • Fresh herbs: Vietnamese noodle salad is typically made with a combination of mint, cilantro, and Thai basil. These herbs add a fresh and aromatic flavor to the dish.
  • Vegetables: The salad typically includes shredded lettuce, cucumber, and carrot. These vegetables add crunch and texture to the dish.
  • Vietnamese dressing: The dressing is what gives the salad its tangy and flavorful taste. The dressing is made with fish sauce, lime juice, sugar, garlic, and chili. The fish sauce is the key ingredient in the dressing and gives the salad its umami flavor.

Vietnamese noodle salad with tangy dressing is a perfect representation of the fresh and vibrant flavors that are so characteristic of Vietnamese cuisine. The combination of vermicelli rice noodles, fresh herbs, and vegetables, and the tangy Vietnamese dressing make this dish a must-try for anyone who loves Vietnamese food.

Preparing the Noodles

Choosing the Right Type

Vietnamese noodle salad is typically made with thin rice vermicelli noodles. These noodles are light, delicate, and have a slightly chewy texture. They are also gluten-free, making them a great option for those with gluten sensitivities.

When selecting rice vermicelli noodles, look for packages that are labeled “rice vermicelli” or “rice stick noodles.” These noodles can usually be found in the international aisle of most grocery stores. Some brands may also specify the noodle thickness, with “bun” or “bun cha” being the thinnest option.

Cooking Techniques

Cooking rice vermicelli noodles is quick and easy. Start by bringing a large pot of water to a boil. Once the water is boiling, add the noodles and stir gently to separate them. Cook the noodles for 3-5 minutes, or until they are tender but still slightly firm.

Once the noodles are cooked, drain them in a colander and rinse them under cold water to stop the cooking process and prevent them from sticking together. Use your hands to gently toss the noodles in the colander to remove any excess water.

To prevent the noodles from clumping together, toss them with a small amount of oil or sesame oil. This will also add flavor to the noodles.

In summary, choosing the right type of noodle and using the correct cooking techniques are important steps in preparing Vietnamese noodle salad. By following these tips, you can ensure that your noodles are tender, flavorful, and perfectly suited for this delicious dish.

Tangy Dressing Composition

Traditional Dressing Ingredients

Vietnamese noodle salad is often served with a tangy dressing that adds a unique flavor to the dish. The traditional dressing is made with a combination of fish sauce, sugar, lime juice, and rice vinegar. These ingredients are mixed together to create a sweet and sour flavor that complements the fresh vegetables and noodles in the salad.

Fish sauce is a key ingredient in the dressing and is made from fermented fish. It has a salty and savory flavor that adds depth to the dressing. Sugar is added to balance out the saltiness of the fish sauce and to give the dressing a slightly sweet taste. Lime juice and rice vinegar are used to add acidity to the dressing, which helps to cut through the richness of the fish sauce and sugar.

Creating the Perfect Balance

The key to creating a delicious tangy dressing is to find the perfect balance between the sweet, salty, and sour flavors.

The amount of each ingredient used will depend on personal taste preferences, but a good starting point is to use equal parts fish sauce and sugar, and then adjust the lime juice and rice vinegar to taste.

To make the dressing, simply whisk together the fish sauce, sugar, lime juice, and rice vinegar until the sugar has dissolved.

Taste the dressing and adjust the flavors as needed. Some people prefer a more sour dressing, while others prefer it to be sweeter. The dressing can also be adjusted by adding more or less water to achieve the desired consistency.

Overall, the tangy dressing is what sets Vietnamese noodle salad apart from other salads.

By using a combination of fish sauce, sugar, lime juice, and rice vinegar, a delicious sweet and sour flavor is created that perfectly complements the fresh vegetables and noodles in the salad.

Assembling the Salad

Layering Components

To assemble the Vietnamese Noodle Salad with Tangy Dressing, start with a bed of vermicelli rice noodles at the bottom of a large salad bowl. Then, add a layer of julienned cucumbers and carrots, followed by a generous amount of fresh herbs such as basil, cilantro, and mint.

To add some protein to the salad, shredded rotisserie chicken or grilled shrimp can be added at this point. Finally, pour the tangy dressing over the salad and toss gently to combine. The salad is now ready to be served.

Garnishing for Flavor and Aesthetics

To enhance the flavor and aesthetics of the Vietnamese Noodle Salad with Tangy Dressing, some garnishes can be added on top. Some popular options include chopped peanuts, fried shallots, and sliced red chili peppers.

Fresh lime wedges can also be served on the side to add some extra acidity and brightness to the salad. These garnishes not only add flavor and texture to the dish but also make it look more visually appealing.

Overall, assembling the Vietnamese Noodle Salad with Tangy Dressing is a simple process that can be done in a few easy steps. By layering the components in the right order and adding some garnishes on top, the salad can be transformed into a delicious and satisfying meal.

Serving and Presentation

Plating Techniques

Vietnamese noodle salad with tangy dressing is a dish that can be served in many different ways. One popular plating technique is to serve the salad in a large bowl, with the noodles and vegetables arranged in an attractive pattern. Another option is to plate the salad on individual plates, with each serving topped with a generous helping of the tangy dressing.

To add visual appeal, garnish the salad with fresh herbs, such as cilantro or mint, or sprinkle some sesame seeds on top.

To make the dish even more colorful, add some sliced red bell peppers or shredded purple cabbage.

Pairing with Other Dishes

Vietnamese noodle salad with tangy dressing is a versatile dish that can be paired with a variety of other foods.

It goes well with grilled meats such as chicken, beef, or shrimp, as well as tofu for a vegetarian option.

For a complete meal, serve the salad with a side of steamed rice or some crispy spring rolls.

Alternatively, pair it with a refreshing drink such as iced tea or a cold beer to balance out the tangy flavors of the salad.

Overall, Vietnamese noodle salad with tangy dressing is a dish that is not only delicious, but also visually appealing.

By using different plating techniques and pairing it with other dishes, you can create a meal that is both satisfying and flavorful.

Frequently Asked Questions

How do you make the dressing for a Vietnamese noodle salad?

The dressing for a Vietnamese noodle salad typically includes fish sauce, rice vinegar, sugar, lime juice, and garlic. Some recipes may also include chili peppers or other spices.

To make the dressing, simply whisk together the ingredients in a small bowl or shake them together in a mason jar.

What are the typical ingredients in a vegetarian Vietnamese noodle salad?

A vegetarian Vietnamese noodle salad typically includes vermicelli rice noodles, fresh herbs such as cilantro and mint, shredded lettuce or cabbage, and a variety of vegetables such as carrots, cucumbers, and bean sprouts. The salad is often topped with peanuts or other nuts for added texture and flavor.

What is the traditional name for a Vietnamese vermicelli noodle salad?

The traditional name for a Vietnamese vermicelli noodle salad is bun cha gio or bun thit nuong. However, there are many variations of this dish and it may be referred to by different names depending on the region or the specific ingredients used.

Can Vietnamese noodle salad be served cold?

Yes, Vietnamese noodle salad is typically served cold or at room temperature. This makes it a refreshing and light dish that is perfect for hot summer days.

How can you adapt a Vietnamese noodle salad recipe to be gluten-free?

To make a Vietnamese noodle salad recipe gluten-free, simply use gluten-free rice noodles instead of traditional wheat-based noodles. Additionally, be sure to use gluten-free soy sauce or tamari in the dressing if the recipe calls for it.

What are some common variations of Vietnamese noodle salad?

There are many variations of Vietnamese noodle salad, but some common variations include adding grilled meat such as chicken or pork, using different types of noodles such as glass noodles or sweet potato noodles, or adding fruits such as mango or papaya for a sweet and tangy twist.

Some Similiar Recipes :

What are the Noodles from the Hunger Movie?

What is Ngo Ngae Noodles? A Guide to this Traditional Thai Dish


Print
clock clock iconcutlery cutlery iconflag flag iconfolder folder iconinstagram instagram iconpinterest pinterest iconfacebook facebook iconprint print iconsquares squares iconheart heart iconheart solid heart solid icon
Vietnamese Noodle Salad with Tangy Dressing is a refreshing and healthy dish that is perfect for any occasion.

Vietnamese Noodle Salad with Tangy Dressing


  • Author: recipe inspire

Description

Vietnamese Noodle Salad with Tangy Dressing is a refreshing and healthy dish that is perfect for any occasion. This salad is a combination of vermicelli rice noodles, fresh herbs, and vegetables that are tossed in a simple and tangy dressing made of soy sauce, lime juice, sugar, rice wine vinegar, and garlic.


Ingredients

Scale

200g rice vermicelli noodles
100g cooked shrimp, peeled
100g cucumber, julienned
100g carrots, julienned
50g fresh mint leaves
50g fresh cilantro
50g roasted peanuts, crushed
For the Tangy Dressing:
60ml fish sauce
30ml lime juice
15ml rice vinegar
30g sugar
2 cloves garlic, minced
1 red chili, finely sliced


Instructions

Cook rice vermicelli noodles according to package instructions, rinse under cold water, and drain.
In a small bowl, whisk together fish sauce, lime juice, rice vinegar, sugar, garlic, and chili until sugar dissolves.
In a large bowl, combine noodles, shrimp, cucumber, carrots, mint, and cilantro.
Pour the dressing over the salad and toss to coat evenly.
Sprinkle with crushed peanuts before serving.

Keywords: Vietnamese Noodle Salad with Tangy Dressing

Extra Crispy Fried Fish

Dive into our Extra Crispy Fried Fish – perfect crunch with every bite!

Extra Crispy Fried Fish: How to Achieve the Perfect Crunch

Extra Crispy Fried Fish

Extra crispy fried fish is a popular dish that is enjoyed around the world. The dish is known for its crunchy exterior and tender, flaky interior. Whether you are looking to make this dish at home or order it at a restaurant, there are a few key things you need to know to ensure that you get the perfect crispy texture.

Choosing the right fish is crucial to making extra crispy fried fish. Some fish, such as cod, haddock, and tilapia, are ideal for frying because they have a mild flavor and firm texture that holds up well during the cooking process. Other fish, such as salmon and tuna, are not recommended for frying because they have a higher fat content that can make the batter soggy. When selecting fish, it is important to look for fresh, high-quality fillets that are free of any discoloration or strong odors.

Key Takeaways

  • Choosing the right fish is crucial to making extra crispy fried fish.
  • The batter ingredients and preparation techniques are important factors in achieving the perfect crispy texture.
  • Frying at the right temperature and serving the fish immediately after cooking can help maintain the crispiness.

History of Fried Fish

Fried fish is a popular and classic dish that has been enjoyed for centuries. The origins of fried fish can be traced back to ancient civilizations such as Egypt and Greece, where fish was often seasoned and fried in olive oil.

In the United Kingdom, fried fish became a staple food during the Industrial Revolution in the 19th century. Fish and chips shops began to pop up all over the country, and the dish quickly became a favorite among the working class.

In the United States, fried fish was introduced by European immigrants in the late 19th and early 20th centuries. African American communities in the South also developed their own unique style of fried fish, often using catfish or other local fish.

Today, fried fish is enjoyed all over the world and is often served with a variety of sides such as french fries, coleslaw, and hushpuppies. While the methods and ingredients used to prepare fried fish may vary, the crispy and savory flavor remains a beloved classic.

Overall, the history of fried fish is a testament to the versatility and adaptability of this beloved dish. Whether enjoyed as a quick snack or a full meal, fried fish continues to be a favorite among people of all ages and backgrounds.

Choosing the Right Fish

When it comes to making extra crispy fried fish, choosing the right type of fish is crucial. Some fish are better suited for frying than others, as they have a firm texture and mild flavor that holds up well during the frying process. Here are a few types of fish that are ideal for making extra crispy fried fish:

1. Cod

Cod is a popular choice for making fried fish due to its firm texture and mild flavor. It is also a versatile fish that can be prepared in a variety of ways, including battered and fried. Cod fillets are thick and meaty, which makes them perfect for frying.

2. Tilapia

Tilapia is another great choice for making fried fish. It has a mild flavor and a firm, flaky texture that holds up well during frying. Tilapia fillets are also thin, which means they cook quickly and evenly.

3. Catfish

Catfish is a Southern favorite that is often fried to perfection. It has a mild, sweet flavor and a firm texture that makes it ideal for frying. Catfish fillets are also thick and meaty, which means they can hold up well during the frying process.

4. Haddock

Haddock is a popular fish in the Northeastern United States and is often used to make fish and chips. It has a firm, flaky texture and a mild flavor that makes it ideal for frying. Haddock fillets are also thick and meaty, which means they can hold up well during the frying process.

When choosing fish for frying, it is important to select fresh fish that is free of any strong odors. It is also important to consider the sustainability of the fish species. Some types of fish are overfished or caught using unsustainable methods, which can harm the environment. By choosing sustainably sourced fish, you can help protect the ocean and ensure that future generations can enjoy delicious fried fish.

Ingredients for Extra Crispy Batter

To make extra crispy fried fish, the batter is the key. The batter should be light, airy, and crispy, and it should stick well to the fish. Here are the ingredients you will need to make extra crispy batter:

Flour

Flour is the main ingredient in the batter. It provides structure and helps the batter adhere to the fish. All-purpose flour is the most commonly used flour for frying fish, but some recipes call for rice flour or cornmeal.

Baking Powder

Baking powder is a leavening agent that helps the batter rise and become light and airy. It also helps the batter become crispy.

Cornstarch

Cornstarch is a common ingredient in batter recipes because it helps the batter become crispy. It also helps the batter stick to the fish.

Egg

Egg is an optional ingredient in batter recipes, but it can help the batter become crispy. It also helps the batter stick to the fish.

Beer

Beer is a popular ingredient in batter recipes because it helps the batter become light and airy. It also adds flavor to the batter. Any type of beer can be used, but light beer is the most commonly used.

Seasonings

Seasonings such as salt, pepper, garlic powder, and onion powder can be added to the batter to add flavor to the fish. Some recipes also call for cayenne pepper or paprika to add a little heat.

Oil

Oil is used to fry the fish. Any type of oil can be used, but vegetable oil or canola oil are the most commonly used because they have a high smoke point and a neutral flavor.

By combining these ingredients, you can create a light and crispy batter for your fried fish.

Preparation Techniques

Cleaning and Filleting

Before preparing the fish, it is essential to clean and fillet it properly. This process involves removing the scales, gutting, and removing the head, tail, and fins. It is recommended to use a sharp fillet knife to avoid damaging the flesh. After cleaning, rinse the fish with cold water and pat it dry with a paper towel.

Marinating the Fish

Marinating the fish is an essential step in preparing extra crispy fried fish. It is recommended to marinate the fish for at least 30 minutes to allow the flavors to penetrate the flesh. A simple marinade can be made with lemon juice, salt, and pepper. However, other ingredients such as garlic, ginger, and herbs can also be added for additional flavor.

Mixing the Batter

The batter is a crucial component in achieving extra crispy fried fish. A good batter should be light, airy, and crispy. To make the batter, mix flour, cornstarch, baking powder, salt, and pepper in a bowl. Gradually add cold water to the mixture while whisking until the batter is smooth. It is important not to overmix the batter, as this can result in a dense and heavy coating.

Overall, following these preparation techniques will result in extra crispy fried fish that is flavorful and delicious.

Dive into our Extra Crispy Fried Fish – perfect crunch with every bite!

Frying Methods

Deep Frying

Deep frying is a popular method of cooking extra crispy fried fish. In this method, the fish is submerged in hot oil, typically at a temperature of 350°F to 375°F, until it is golden brown and crispy.

To deep fry fish, a deep fryer or a heavy-bottomed pot can be used. It is important to use a neutral oil with a high smoke point, such as canola or vegetable oil. The fish should be coated in a batter or breading before being fried to ensure a crispy exterior.

One benefit of deep frying is that the fish cooks quickly and evenly. However, it is important to monitor the temperature of the oil to prevent burning or overcooking. Additionally, deep frying can be a messy and potentially dangerous process, so caution should be taken.

Pan Frying

Pan frying is another popular method for cooking extra crispy fried fish. In this method, the fish is coated in a breading or flour mixture and then fried in a small amount of oil in a shallow pan.

To pan fry fish, a non-stick skillet or cast iron pan can be used. It is important to use a neutral oil with a high smoke point, such as canola or vegetable oil. The fish should be patted dry and seasoned before being coated in a breading or flour mixture.

One benefit of pan frying is that it requires less oil than deep frying, making it a healthier option. However, it can be more difficult to achieve a crispy exterior with this method. It is important to flip the fish carefully and cook it over medium-high heat to ensure even browning.

Overall, both deep frying and pan frying are effective methods for cooking extra crispy fried fish. The choice of method depends on personal preference and the equipment available.

Serving Suggestions

Side Dishes

When serving extra crispy fried fish, it’s important to choose side dishes that complement the flavors and textures of the fish. Some classic side dishes that pair well with fried fish include:

  • Coleslaw: A refreshing and crunchy coleslaw can help cut through the richness of the fried fish. Try making a classic coleslaw with cabbage, carrots, and a tangy dressing made with vinegar, mayonnaise, and sugar.
  • French Fries: Crispy french fries are a classic side dish for fried fish. Serve them hot and salted for the best results.
  • Hushpuppies: These deep-fried cornmeal balls are a Southern classic that pair perfectly with fried fish. Serve them with a side of honey butter for a sweet and savory treat.

Sauces and Dips

A great sauce or dip can take extra crispy fried fish to the next level. Here are some options to consider:

  • Tartar Sauce: This classic sauce is made with mayonnaise, pickles, and lemon juice. It’s tangy and creamy and pairs perfectly with fried fish.
  • Remoulade: Similar to tartar sauce, remoulade is a tangy and spicy sauce made with mayonnaise, mustard, and pickles. It’s a great option if you want to add some heat to your fried fish.
  • Lemon Aioli: For a lighter and fresher option, try making a lemon aioli. Mix mayonnaise with lemon juice, garlic, and salt for a tangy and zesty dip that pairs perfectly with fried fish.

When serving extra crispy fried fish, it’s important to balance the richness and heaviness of the fish with refreshing and flavorful side dishes and dips. These suggestions are just a starting point, so feel free to experiment with your own favorite flavors and ingredients.

Tips for Extra Crispiness

When it comes to making extra crispy fried fish, there are a few tips and tricks that can make all the difference. Here are some of the best ways to achieve that perfect crunch:

Use the Right Batter

The batter is a crucial component of crispy fried fish. A good batter should be light and airy, with enough structure to hold onto the fish without being too thick. Consider using a combination of flour and cornstarch, which will create a light, crispy coating that won’t become soggy.

Keep the Oil Hot

One of the most important factors in achieving extra crispy fried fish is maintaining the correct oil temperature. If the oil is too cool, the fish will absorb too much oil and become greasy. On the other hand, if the oil is too hot, the outside of the fish will burn before the inside is cooked. Aim for an oil temperature of around 375°F (190°C) for best results.

Don’t Overcrowd the Pan

When frying fish, it’s important not to overcrowd the pan. If there are too many fillets in the oil at once, the temperature will drop and the fish won’t cook evenly. Instead, fry the fish in small batches, and keep the cooked fillets warm in a low oven until all the fish is done.

Drain the Fish Well

After frying, it’s important to drain the fish well to remove any excess oil. Place the fish on a wire rack set over a baking sheet, or on a bed of paper towels. This will help to keep the fish crispy and prevent it from becoming soggy.

By following these tips, you can achieve extra crispy fried fish that is sure to impress.

Health and Nutrition Information

Extra crispy fried fish is a popular dish enjoyed by many people around the world. While it is delicious, it is important to understand the potential risks and benefits associated with consuming this dish.

Nutritional Value

Fried fish provides essential nutrients such as protein, omega-3 fatty acids, vitamins, and minerals. However, it is important to choose healthier cooking methods and ingredients to minimize the negative effects of frying. Deep-fried fish, in particular, is high in calories and can contribute to weight gain and obesity. On average, a standard serving size of fried fish (100 grams or 3.5 ounces) contains approximately 232 calories Chef’s Resource.

Potential Risks

Frying can decrease the amount of essential nutrients like iron and vitamins B and C in fish Karock’s Food. In addition, consuming fried fish on a regular basis may increase the risk of developing chronic diseases such as type 2 diabetes, heart disease, and high blood pressure Health Reporter.

Moderation is Key

Therefore, it is important to enjoy fried fish in moderation. This means consuming it as an occasional treat rather than a regular part of the diet. It is also recommended to choose healthier cooking methods such as baking, grilling, or broiling instead of frying. By doing so, one can still enjoy the delicious taste of fish while promoting overall health and well-being.

Storing and Reheating Leftovers

Extra crispy fried fish is a delicious treat that can be enjoyed as a meal or a snack. However, it is not always possible to finish the entire portion in one sitting. In such cases, it is important to store the leftover fried fish properly to maintain its quality and freshness.

Storing Leftovers

The best way to store leftover fried fish is by placing it in an airtight container and storing it in the refrigerator. This helps to prevent moisture from entering the container and keeps the fish fresh for a longer period of time. It is recommended to consume the leftover fried fish within two days of storage.

Reheating Leftovers

Reheating leftover fried fish can be a tricky task as it tends to lose its crispiness and become soggy. However, there are a few methods that can help restore the crispy texture of the fish.

Oven Baking

One of the most popular methods of reheating leftover fried fish is by using an oven. Preheat the oven to 350°F and place the leftover fried fish on a baking sheet lined with parchment paper. Bake for 10-15 minutes or until the fish is heated through and crispy.

Air Frying

Another method of reheating leftover fried fish is by using an air fryer. Preheat the air fryer to 375°F and place the leftover fried fish in the basket. Cook for 5-7 minutes or until the fish is heated through and crispy.

Pan-Frying

Pan-frying is also a good option for reheating leftover fried fish. Heat a small amount of oil in a non-stick pan over medium heat. Place the leftover fried fish in the pan and cook for 2-3 minutes on each side or until the fish is heated through and crispy.

In conclusion, storing and reheating leftover fried fish requires proper techniques to maintain its quality and texture. By following the methods mentioned above, you can enjoy delicious and crispy fried fish even after it has been stored in the refrigerator.

Frequently Asked Questions

What is the best type of fish to use for achieving extra crispy texture when frying?

The best type of fish to use for achieving extra crispy texture when frying is a firm, white-fleshed fish such as cod, haddock, or halibut. These fish have a mild flavor and a texture that holds up well to frying.

Can you share a simple yet effective recipe for a crispy fish batter?

A simple yet effective recipe for a crispy fish batter is to mix together flour, cornstarch, baking powder, salt, and spices such as paprika and cayenne pepper. The fish is then dipped in the batter and fried until crispy.

What techniques ensure a crispy coating when frying fish with flour?

To ensure a crispy coating when frying fish with flour, it is important to make sure the fish is dry before coating it with flour. The flour should be seasoned with salt and spices to add flavor, and the fish should be fried in hot oil until golden brown.

What ingredients are essential for creating a crispy batter for deep-frying fish?

The essential ingredients for creating a crispy batter for deep-frying fish include flour, cornstarch, baking powder, salt, and spices such as paprika and cayenne pepper. Beer or club soda can also be added to the batter to create a light and crisp texture.

How do you properly fry fish in a pan with oil to get a crispy outcome?

To properly fry fish in a pan with oil to get a crispy outcome, it is important to use a heavy-bottomed pan and enough oil to fully submerge the fish. The oil should be heated to the correct temperature, and the fish should be fried in small batches to avoid overcrowding the pan. The fish should be turned only once during cooking to prevent the coating from falling off.

What are some tips for maintaining the crispiness of fried fish when serving?

To maintain the crispiness of fried fish when serving, it is important to serve the fish immediately after frying. The fish should be drained on paper towels to remove excess oil, and it should be kept warm in a low oven until ready to serve. It is also important to avoid covering the fish with a lid or wrapping it in foil, as this can cause the coating to become soggy.

Print
clock clock iconcutlery cutlery iconflag flag iconfolder folder iconinstagram instagram iconpinterest pinterest iconfacebook facebook iconprint print iconsquares squares iconheart heart iconheart solid heart solid icon
Extra Crispy Fried Fish

Extra Crispy Fried Fish


  • Author: recipe inspire

Description

Extra crispy fried fish is a popular dish that is enjoyed around the world. The dish is known for its crunchy exterior and tender, flaky interior.


Ingredients

Ingredients:
 
White fish fillets: 4 (cod or haddock)
Flour: 1 cup
Cornstarch: ½ cup
Baking powder: 1 tsp
Cold water: 1 cup
Salt & Pepper: To taste
Oil: For frying

Instructions

Mix: Combine flour, cornstarch, baking powder, salt, and pepper.
Stir: Add cold water to form batter.
Dip: Fish fillets in batter.
Fry: In hot oil until golden and crispy.

Keywords: Extra Crispy Fried Fish

For more Similiar Recipes :

Deliciously Simple Barramundi Recipes for Every Occasion

Delicious and Diverse Chicken of the Woods Recipes

Traditional Filipino Bibingka

Traditional Filipino Bibingka is a classic delicacy that is popularly enjoyed during the Christmas season in the Philippines.

Traditional Filipino Bibingka: A Guide to the Classic Rice Cake Dish

Traditional Filipino Bibingka is a classic delicacy that is popularly enjoyed during the Christmas season in the Philippines.

Traditional Filipino Bibingka is a classic delicacy that is popularly enjoyed during the Christmas season in the Philippines. This unique rice cake is made from a mixture of rice flour, coconut milk, and sugar, and is typically cooked in clay pots lined with banana leaves. Bibingka is often served hot, garnished with grated coconut, slices of salted duck egg, and cheese.

The history of Bibingka dates back to the pre-colonial era in the Philippines when rice cakes were already a staple food. Over time, the recipe evolved to include coconut milk and other ingredients, making it the Bibingka we know today. The dish has become a significant part of Filipino culture, especially during the Christmas season when it is traditionally sold outside churches after the early morning masses.

Key Takeaways

  • Traditional Filipino Bibingka is a classic rice cake that is popularly enjoyed during the Christmas season in the Philippines.
  • The dish is made from a mixture of rice flour, coconut milk, and sugar, and is typically cooked in clay pots lined with banana leaves.
  • Bibingka has a rich history that dates back to the pre-colonial era in the Philippines and has become an important part of Filipino culture.

History of Bibingka

Bibingka is a traditional Filipino rice cake that has been enjoyed for centuries. Its origins can be traced back to the pre-colonial period when early Filipinos made a similar cake known as “bibingka glutinosa” using sticky rice flour, sugar, and water. This cake was traditionally cooked over the fire in banana leaf wrappers. It is thought that the Tagalog word “bingka” is the root of the name bibingka [1].

Pre-Colonial Origins

Bibingka has been a part of Filipino culture for centuries. It was a staple food for early Filipinos and was often served during special occasions such as weddings and religious festivals. The pre-colonial bibingka was made from glutinous rice flour and coconut milk, and was cooked in banana leaves over a fire. It was often served with a sweet coconut sauce or grated coconut [2].

Spanish Colonial Influence

During the Spanish colonial period, new ingredients and cooking methods were introduced to the Philippines, including wheat flour and the use of ovens. These new ingredients and methods led to the evolution of bibingka. The Spanish version of bibingka was made with wheat flour, eggs, sugar, and milk, and was often topped with butter and grated cheese. It was typically served during the Christmas season [1].

Evolution Through the Years

Over the years, bibingka has continued to evolve and has taken on different variations throughout the Philippines. Some regions use different types of rice flour, such as galapong, which is made from soaked and ground glutinous rice. Other regions use coconut milk or cassava flour in their bibingka. In some areas, bibingka is cooked in clay pots or in a special bibingka oven called a “bibingkaan” [3].

Today, bibingka remains a popular Filipino dessert and is often enjoyed during the Christmas season. It is typically served hot and is often paired with a side of salted egg, grated coconut, or cheese. The history and evolution of bibingka reflects the lively nature of culinary traditions, influenced by changing tastes, available resources, and cultural shifts over time [4].

Ingredients and Variations

Traditional Ingredients

Bibingka is traditionally made with ground soaked glutinous rice, coconut milk, sugar, and eggs. These ingredients are mixed together to form a batter that is then poured into banana leaf-lined clay pots and baked over hot coals. The resulting cake is dense and chewy with a slightly sweet and nutty flavor from the coconut milk.

Regional Variations

There are many regional variations of bibingka in the Philippines. Some regions add unique ingredients to the batter such as cheese, salted eggs, or purple yam (ube) to give the cake a distinct flavor and color. In the Visayas region, bibingka is made with grated cassava and coconut milk, while in the Bicol region, it is made with galapong (rice flour) and coconut cream.

Modern Twists

In recent years, chefs and home cooks have experimented with new flavors and ingredients to put a modern twist on traditional bibingka. Some variations include adding pandan leaves to the batter for a fragrant, green-hued cake, or topping the cake with sliced mangoes and whipped cream for a tropical twist. Some have also made bibingka cupcakes or added chocolate chips to the batter for a chocolatey version of the cake.

Here’s a table summarizing the traditional ingredients and some popular regional variations of bibingka:

Traditional Ingredients Regional Variations
Ground soaked glutinous rice Cheese
Coconut milk Salted eggs
Sugar Purple yam (ube)
Eggs Grated cassava and coconut milk
Banana leaves for lining Galapong (rice flour) and coconut cream

Overall, bibingka is a versatile and delicious cake that can be enjoyed in its traditional form or with a modern twist.

Cultural Significance

Bibingka plays a significant role in Filipino culture, particularly during Christmas. It is a traditional Filipino food that symbolizes togetherness, celebration, and hospitality.

Christmas Tradition

Bibingka is a staple food during the Christmas season in the Philippines. It is often served during “Simbang Gabi,” a nine-day novena of dawn masses leading up to Christmas Day. According to Filipino tradition, those who complete the nine-day novena are granted a wish.

Bibingka in Filipino Celebrations

Aside from Christmas, bibingka is also served during other Filipino celebrations such as weddings, birthdays, and fiestas. It is often sold by street vendors and can be enjoyed any time of the day.

Bibingka is more than just a food in Filipino culture. It is a symbol of Filipino hospitality and generosity. It brings people together and creates a sense of community. The preparation and sharing of bibingka during celebrations is a way for Filipinos to connect with their culture and traditions.

Preparation Techniques

Traditional Baking Methods

Bibingka is traditionally baked in a clay pot called a “bibingka oven” or “pugon.” The oven is heated with charcoal or wood, and the bibingka is cooked on top of banana leaves. The heat from the charcoal or wood cooks the bibingka from the bottom, while the heat from the top of the oven browns the top of the bibingka. This method results in a crispy, slightly charred top and a moist, fluffy center.

Another traditional method of baking bibingka is to use a large, flat pan or skillet. The batter is poured into the pan and cooked over a charcoal or wood fire. The pan is covered with a metal dome to trap the heat and cook the bibingka evenly. This method produces a bibingka with a soft, cake-like texture.

Cooking Utensils and Equipment

In addition to the bibingka oven and skillet, there are other utensils and equipment necessary for making bibingka. A mixing bowl and whisk are needed to combine the ingredients for the batter. A spatula or spoon is used to pour the batter into the bibingka oven or skillet. Banana leaves are used to line the bottom of the bibingka oven or skillet and to cover the top of the bibingka while it is cooking. A metal dome or cover is used to trap the heat and cook the bibingka evenly.

To prepare the banana leaves, they must be washed and dried thoroughly. The leaves are then cut into the appropriate size and shape to fit the bibingka oven or skillet. The leaves are then lightly toasted over an open flame to make them pliable and easier to work with.

Overall, the traditional baking methods and cooking utensils used for making bibingka are simple and straightforward. The use of banana leaves and clay pots adds a unique flavor and texture to the bibingka, making it a beloved Filipino delicacy.

Serving and Presentation

Accompaniments and Toppings

Bibingka is traditionally served with a variety of accompaniments and toppings that enhance its flavor and texture. Some of the most popular accompaniments include grated coconut, slices of salted duck egg, and cheese. These ingredients add a sweet, salty, and creamy taste to the bibingka and make it more enjoyable to eat.

Other common toppings include butter, sugar, and condensed milk. These ingredients are typically added to the bibingka while it is still warm, allowing them to melt and create a delicious glaze on top of the cake. Some people also like to add fruits, such as mango or banana, to their bibingka for an extra burst of flavor.

Plating Styles

Bibingka can be served in a variety of plating styles, depending on the occasion and personal preference. One popular way to serve bibingka is to wrap it in banana leaves, which adds a rustic and traditional touch to the presentation. This style of plating is often used during special occasions, such as Christmas or weddings.

Another common plating style is to cut the bibingka into small squares or triangles and serve them on a plate. This style is more suitable for casual gatherings or everyday meals. Some people also like to add a scoop of ice cream or whipped cream on top of the bibingka to make it more decadent.

Overall, serving and presenting bibingka is a matter of personal preference and creativity. Whether it’s served with traditional accompaniments or presented in a unique plating style, bibingka is sure to delight anyone who tries it.

Nutritional Information

Bibingka is a traditional Filipino dessert that is enjoyed during the Christmas season. While it is a tasty treat, it is important to consider its nutritional value.

One serving of bibingka (100g) contains approximately 235 calories, 7g of fat, 40g of carbohydrates, and 3g of protein. It is also rich in calcium, iron, and vitamin A.

The high carbohydrate content in bibingka is due to the use of glutinous rice flour, which is a staple ingredient in many Filipino desserts. However, it is important to note that excessive consumption of carbohydrates can lead to weight gain and other health issues.

Bibingka also contains coconut milk, which is high in saturated fat. While saturated fat is necessary for the body, excessive consumption can increase the risk of heart disease. It is recommended to consume bibingka in moderation as part of a balanced diet.

In conclusion, bibingka is a delicious dessert that is enjoyed during the holiday season in the Philippines. While it is high in calories and carbohydrates, it is also rich in essential nutrients. It is important to consume bibingka in moderation as part of a balanced diet to avoid any negative effects on health.

Conservation and Storage

To ensure that traditional Filipino bibingka stays fresh and tasty, proper storage is essential. Here are some tips on how to store bibingka:

  • Room temperature: Freshly baked bibingka can be kept at room temperature for up to two days. However, it should be covered with a clean cloth or plastic wrap to prevent it from drying out.
  • Refrigeration: If you want to keep bibingka for a longer period, it can be refrigerated for up to a week. Wrap it tightly in plastic wrap or aluminum foil before refrigerating it to prevent it from drying out.
  • Freezing: Bibingka can be frozen for up to three months. Wrap it tightly in plastic wrap or aluminum foil before freezing it. When you want to eat it, thaw it at room temperature for a few hours or in the refrigerator overnight.

It’s important to note that reheating bibingka can affect its texture and flavor. To reheat bibingka, wrap it in aluminum foil and heat it in the oven at 350°F for 10-15 minutes. Alternatively, you can microwave it for 30 seconds to one minute, but this may cause the bibingka to become dry.

By following these simple storage tips, you can enjoy traditional Filipino bibingka for days or even weeks after it’s been baked.

Frequently Asked Questions

What are the essential ingredients for making traditional Filipino Bibingka?

The essential ingredients for making traditional Filipino Bibingka include glutinous rice flour, coconut milk, sugar, eggs, baking powder, and banana leaves. Some variations of the recipe may include additional ingredients such as cheese, butter, and condensed milk.

How do you make a traditional Bibingka using condensed milk?

To make a traditional Bibingka using condensed milk, you can substitute some of the sugar with condensed milk and adjust the amount of liquid accordingly. The rest of the recipe remains the same.

Can you provide a simple recipe for homemade Filipino Bibingka?

Here is a simple recipe for homemade Filipino Bibingka:

  • Preheat the oven to 375°F.
  • In a bowl, mix 2 cups of glutinous rice flour, 1/2 cup of sugar, 1 tablespoon of baking powder, and 1/4 teaspoon of salt.
  • In a separate bowl, beat 3 eggs and mix in 1 can of coconut milk.
  • Combine the wet and dry ingredients and mix well.
  • Grease a 9-inch round cake pan and line it with banana leaves.
  • Pour the batter into the pan and bake for 25-30 minutes or until golden brown.
  • Serve warm with grated coconut on top.

What distinguishes Royal Bibingka from the traditional Bibingka?

Royal Bibingka is a more elaborate version of the traditional Bibingka that is typically served during special occasions. It is made with a mixture of glutinous and regular rice flour, and includes additional ingredients such as butter, cheese, and salted duck eggs. It is also baked in a special clay pot called a bibingka oven.

Is there a difference between Bibingka and Bebinca, and what is it?

Yes, there is a difference between Bibingka and Bebinca. Bibingka is a Filipino rice cake made with glutinous rice flour, while Bebinca is a layered dessert made with coconut milk, sugar, and flour that originated in Goa, India.

What cultural significance does Bibingka hold in Filipino traditions?

Bibingka holds significant cultural importance in Filipino traditions, especially during the Christmas season. It is often served during Simbang Gabi, a nine-day novena of masses leading up to Christmas Day. Bibingka symbolizes the warmth of Filipino hospitality and togetherness during the holiday season.

Print
clock clock iconcutlery cutlery iconflag flag iconfolder folder iconinstagram instagram iconpinterest pinterest iconfacebook facebook iconprint print iconsquares squares iconheart heart iconheart solid heart solid icon
Traditional Filipino Bibingka is a classic delicacy that is popularly enjoyed during the Christmas season in the Philippines.

Traditional Filipino Bibingka


  • Author: recipe inspire

Description

Traditional Filipino Bibingka is a classic delicacy that is popularly enjoyed during the Christmas season in the Philippines. This unique rice cake is made from a mixture of rice flour, coconut milk, and sugar, and is typically cooked in clay pots lined with banana leaves. Bibingka is often served hot, garnished with grated coconut, slices of salted duck egg, and cheese.


Ingredients

Scale

200g rice flour
2 tsp baking powder
100g sugar
1/4 tsp salt
400ml coconut milk
2 eggs
Butter, grated coconut, and cheese for topping


Instructions

Mix Dry Ingredients: Combine rice flour, baking powder, sugar, salt.
Wet Ingredients: Add coconut milk and eggs, mix until smooth.
Bake: Pour into a banana leaf-lined pan, bake at 175°C for 25 minutes.
Top: Brush with butter, add cheese and coconut.